
How To Check If Your CPU Cooler Is Working: The computer system seems effective and easy to operate and complete your tasks within a short time frame, saving time and energy at work or home. A good computer system is determined by its configures and the amount of tasks that it can work with based on the Random Access Memory (RAM), the kind of processor as well as other features.
Understand the fact that your computer system works with power which generates heat to signal that it works perfectly. Excessive overheating can cause the computer system to function unusually, slowing down its process input and also turning off abruptly.
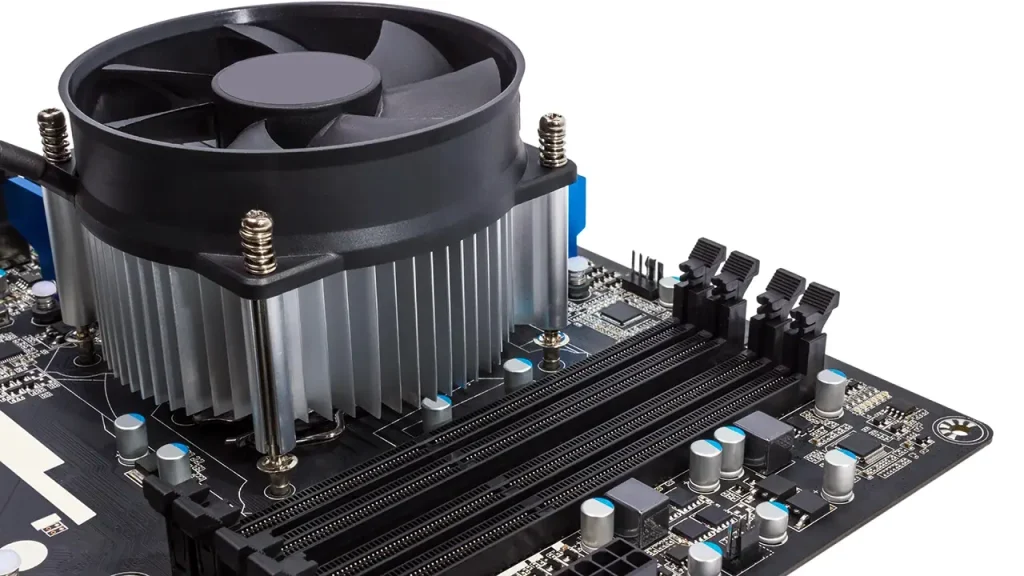
However, the processor, which is just like the computer’s main CPU, emits intense heat due to the input or output process of the computer system. To monitor and create an escape route from the heat, the CPU cooler comes in. This cooler is a piece of structured component that has a fan attached to it and is mounted onto the processor over the motherboard to make the fly through its vents.
During this process, the CPU gets cooled down upon every operation. If the CPU cooler is faulty the computer system won’t be able to function properly and also result in overheating-related issues. This happens most of the time due to when the CPU cooler isn’t mounted correctly. So we must check if our CPU is mounted properly.
How do you check if your CPU cooler is mounted properly?
In this article, we will go through the safety methods to consider coupled with hassle-free and quick steps. Read on to learn how to go about it.
Inspect The CPU Cooler Installation
This should be the first thing you do after uncoupling your PC. Remember how the CPU cooler connects to the processor, and you need to check to see if it’s stationed properly to allow maximum heat transfer between the processor and the cooler. Here’s how to know if your CPU cooler isn’t properly mounted.
- There is a gap between the Cooler and the CPU lid which presupposes that the cooler must come in contact with the CPU itself to enclose the gap and have a steady flow of heat transfer. Otherwise, the efficiency of such heat transfer will be reduced which subsequently affects the cooling process.
- When the Thermal paste is not enough. Most times it is wrongly applied or substituted for another paste on the processor without knowing its adverse effects. With little or no thermal paste, there would be efficient heat dissipation and heat transfer toward the air vents.
- The CPU cooler can be detached easily and also wiggles a lot. When the connection is loose, the CPU cooler produces noise by vibrating against the motherboard which in turn leads to potential damage on the motherboard.
After noticing these signs make sure to fix the issues to prevent additional damage which may incur further repair costs in the future.
Check If The Pushpins Are Fastened Properly
Pushpins are very, and stationed under the motherboard; they can be difficult and tricky to install or remove at times, which requires careful practice and consideration. The pushpins are like pillars of the CPU cooler which can be attached to the motherboard when mounting it over the processor. Proper contact with the motherboard as well as the processor enables it to cool down the PC effectively.
Most pushpins are required to be pushed to secure it with the motherboard, while others require to be tightened with screwdrivers and certain tools. Lack of proper tightening and placement leads to Excessive temperature. So whatever kind of pushpin your CPU cooler comes with, ensure that they are rightly placed and turned in the appropriate direction as well as being pushed down.
Check If The Screws Are Tight Enough
You should be able to determine if the screws connecting the air cooler to the motherboard should be tight enough or be at a minimal level. In some cases, much pressure has the potential to damage the motherboard. Therefore, it leads to bending if it happens to be less firm. Additionally, your PC might also cause random problems like shutting down or having a boot error at regular intervals. Make sure not to overtight the screws. All you need to do is to lighten them enough.
Apply The Thermal Paste Properly
Placing a right and quality thermal paste over the CPU compound isn’t enough to make it function properly, But applying it appropriately does. Understand that there are microscopic irregularities that prevent perfect contact both on the CPU’s lid and the Cooler’s surface. Therefore, a good thermal paste made from an excellent heat conductor fills the spaces by maximizing heat transfer.
Contrarily, this is what happens when you apply a bad thermal paste as well as applying a good one in the wrong way:
- A bad thermal paste will prevent heat transfer capabilities, and the same thing applies to other debris, dust, and others.
- An expired paste will be prone to contamination and may be ineffective on your PC’s CPU compounds.
- If the paste is dried up, it introduces air into the paste, which is bad for permanence and also hinders cooling effectiveness.
- The temperature of every CPU core differs when the right thermal paste is applied unevenly by not cooling some parts of the CPU cores efficiently.
Noteworthy, the usage of a fresh paste to ensure the efficiency of your CPU serves as your best bet.
Monitor Your Overall Compter’s Behaviour After Installation
Without following the stated procedures, your computer’s booting process might fail which will point to a thermal event. Another you need to do is to closely observe the fan as well as its speed, then you should restart the computer. If the fan makes an unusual sound during this process then your cooler isn’t installed properly.
Don’t forget to monitor the temperature of your CPU. Remember that high temperature slows down the PC’s overall process and abruptly shuts it down. Your CPU should be at medium temperature or relatively low even under heavy workloads. There will be a high temperature on the CPU if you take the wrong steps when installing the CPU cooler. Invariably a normal CPU temperature should be between 149F and 167F (65C-75C)
Read:NVME, HDD and SSD Lifespan (Comparison & Difference)
Frequently Asked Questions
What happens if the CPU cooler is too loose?
The components of your motherboard get vulnerable to short circuits if your CPU cooler loses or shifts by making contact with other components.
How do I check my CPU Cooler Speed?
Check the Bios of UEFI settings on your PC, then look for a section related to hardware monitoring health. Also, some motherboard manufacturers offer their own software for monitoring and controlling hardware, including fan speed. You can also check if your motherboard manufacturer provides such software.
What causes my PC to overheat?
Your PC might overheat due to various reasons, which include; working with it in a non-ventilated area and running high-end programs that exceed the computer’s overall capacity. And also blocking the air vent from effective heat transfer.
Conclusion
Overall, visual inspection is very important after mounting your CPU cooler because if there are any errors, you will quickly notice them and fix them within time. The behavior of the computer should be closely monitored, even if it takes performing stress tests right from the booting sequence to the full boot. Ensure to implement all the procedures stated above because there is no expected effect after adjusting the CPU cooler, then there was a mistake when installing it properly